Core Capabilities
Hardware-feel workflow with the depth of a modern sound design environment.
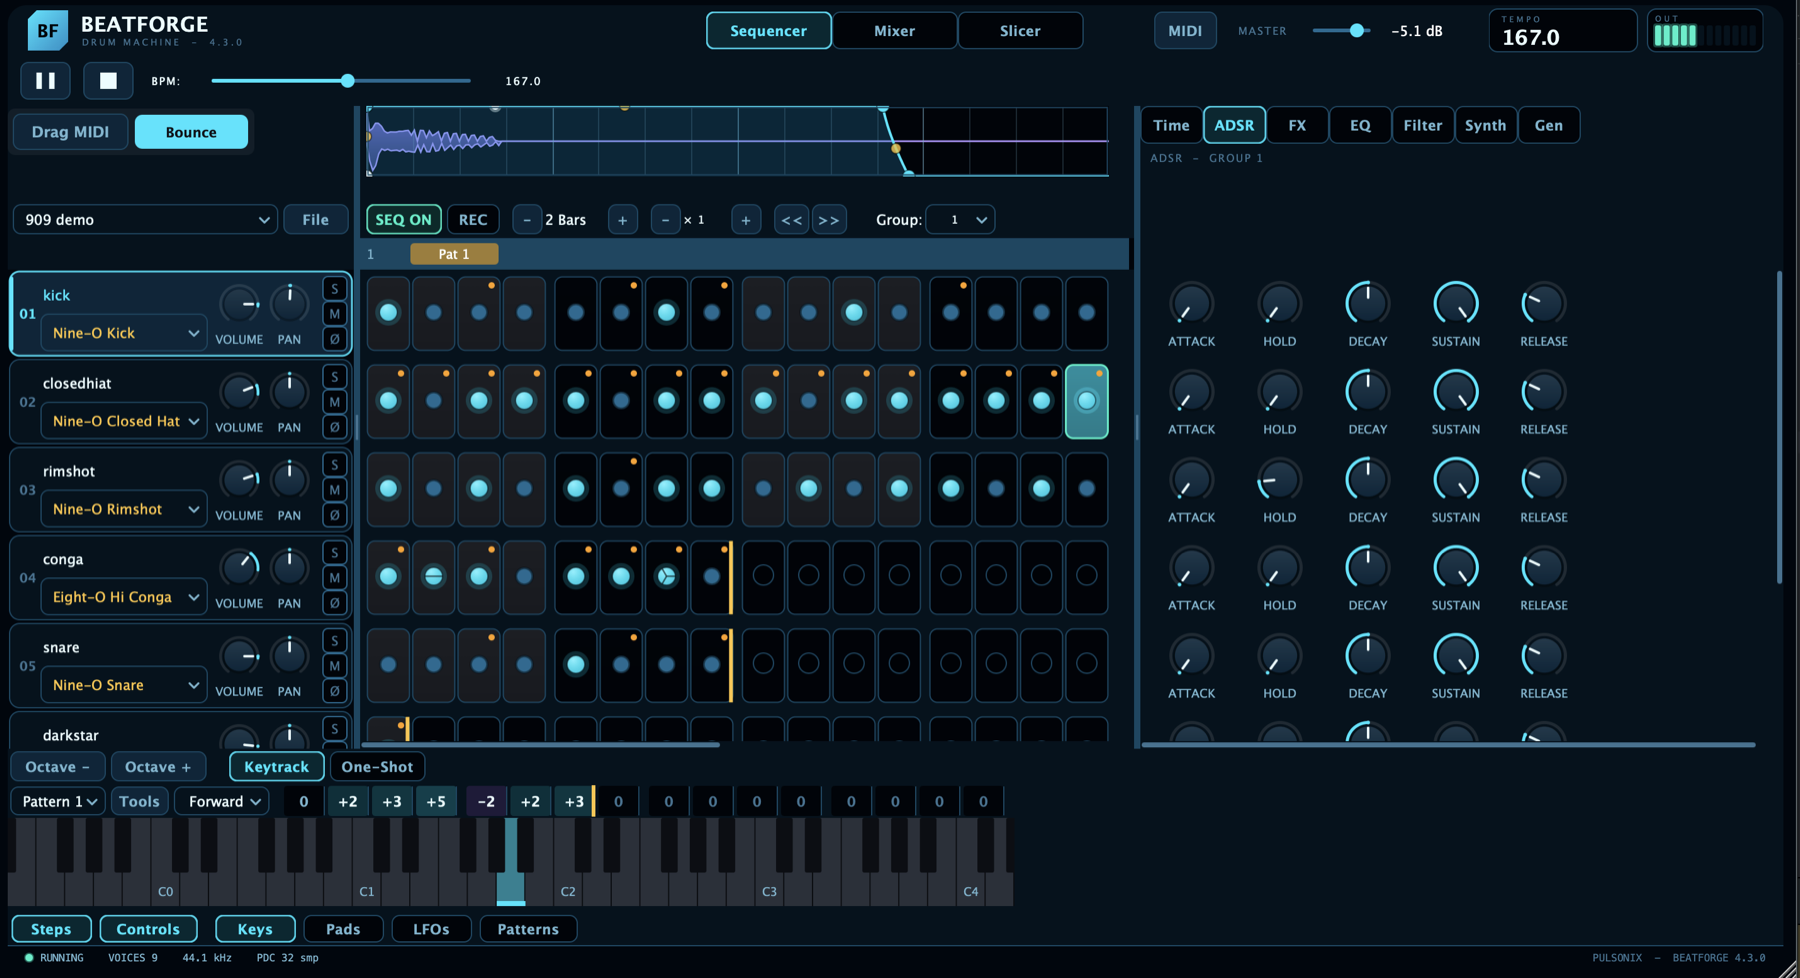
30+ Drum Synth Models
Full 808 and 909 kits circuit-modeled — kicks, snares, hats, toms, claps, cymbals, congas, claves. Plus Vintage DCO, Hoover, Reese Bass, Supersaw, FM Kick, and Karplus Snare. All synthesized, no samples.
Authentic Tube Saturation
Real Koren 12AX7 valve modeling with asymmetric saturation and natural second-harmonic warmth. Plus Soft, Hard, Foldback, and Hardcore modes for everything from analog gloss to total destruction.
32 Edit Groups Per Track
Up to 32 distinct sound variations per track, assignable per step. One kick track, dozens of kicks across the pattern. Build entire fills, ghost notes, accent layers, and humanized variations on a single track. No other drum machine plugin lets you go this deep without leaving the row.
10 LFOs + Shape Editor
Draw custom LFO curves with tension control. Sync to host, free-run, or trigger per step. Per-target bypass without losing depth. 5-stage AHDSR envelopes with adjustable tension on every stage.
Per-Step Parameter Locks
Every knob is automatable per-step. Pitch, filter, distortion, synth shape, bit depth, sample rate — anything. Shift-select steps, move a knob, done. Hit chance, sub-steps, and polyrhythm endpoints built in.
Generative Fills (GEN)
Euclidean fill with a live HITS knob — hear the pattern morph as you turn. Dice & density seeded random fills, plus rotation arrows to shift any pattern left or right. Happy accidents, on demand.
808-Style Accents
A dedicated per-step accent row with a global accent amount — the classic hardware trick for grooves that breathe. Accents carry through to MIDI export so your DAW clip keeps the dynamics.
Per-Track Speed
Run any track at 1/4× to 4× the pattern speed, triplet ratios included. Half-time kicks under double-time hats, polytempo textures, instant drum & bass — all inside one pattern.
Link Groups
Tag steps or REX slices into colored groups and edit them as one. Shift-click recalls a group's settings everywhere it appears. Build variations that stay consistent across the whole pattern.
Multi-Out Slice Routing
Route individual REX slices or whole link groups to separate plugin outputs. Process the snare slices through your favorite bus chain while the rest stays on the main out. Remixing, solved.
Vintage Lo-Fi Topology
Hardware-accurate sampler emulation. Anti-aliasing, zero-order hold, noise-shaped bitcrushing, and 3 character shapes: Arcade, Vintage Sampler, and Crunch. Per-track lo-fi without compromising the rest of the mix.
BeatForge Sculptor EQ
Dedicated drum-tuned EQ with five musical bands: Sub, Thump, Clean, Crack, and Air. Each band targets specific drum frequencies — boost punch at 120Hz, snap at 3kHz, presence at 10kHz. Tube exciter on the high band.
Full MIDI Control
MIDI Learn on every knob, every step, every button. Native Launch Control XL integration with bidirectional LED feedback. Full MIDI I/O per track. Drag-and-drop MIDI export of any pattern or REX slice.
Smart Sample Engine
AI-powered BPM detection via Beat This!. Native REX support plus a built-in slicer for WAV/AIFF/FLAC/MP3/OGG. Random sample & slice modes, time-stretch or resample pitch, full undo/redo. Drag-and-drop everything.
BeatForge In Action
More demos and walkthroughs on our YouTube channel.
User Manual
Master the workflow: from AI-assisted importing to per-step parameter locking.
1. Installation & Setup
BeatForge runs as a Standalone App and as a VST3/AU Plugin. The installer handles placement automatically.
Installation
- Windows: Run the
.msiinstaller. You can select which components to install (Standalone/VST3). The installer will automatically place plugins in the correct system folder (C:\Program Files\Common Files\VST3) so your DAW can find them. - macOS: Open the
.dmgfile. Drag the BeatForge app to your Applications folder. To install the plugins (VST3/AU), run the separate.pkginstaller found inside the disk image.
Activation
- Free Trial: On first launch, click "Start Trial" to begin a fully functional 14-day evaluation.
- Purchase: Click the "Buy Now" button on our website. You will receive a license code via email from Lemon Squeezy immediately after purchase.
- Unlock: Copy the code from your email and paste it into the BeatForge activation screen to unlock your lifetime license.
2. The Three Views
Navigate using the large buttons at the top of the interface:
- Sequencer: The main hub. Manage tracks, sequencing, LFOs, and sound design (Mix, ADSR, FX, EQ, Filter, Synth).
- Mixer: A dedicated view for quick audio and MIDI routing. Use this to assign Audio Outputs and set MIDI Input/Output channels for all tracks side-by-side. The Volume and Pan sliders here are Master Controls that sit after the sequencer's internal mixing chain.
- Slicer: The advanced sample editor. View waveforms, detect transients, and slice standard audio loops. (Note: REX files are read-only in this view).
3. Smart Import & AI BPM
BeatForge integrates the advanced Beat This! AI algorithm to analyze samples instantly upon import.
- Drag & Drop: Drop any WAV, AIFF, FLAC, MP3, OGG, or REX (.rx2) file onto a track slot.
- Auto-Sync: The engine detects the sample's BPM automatically.
- If you play the loop unsliced, BeatForge automatically applies Time Stretching to lock it to your project tempo.
- If you Slice the loop, synchronization is handled by the sequencer triggering individual slices at the correct time, keeping your transients crisp without stretching artifacts.
- Manual Correction: In the rare case the detected BPM is incorrect, you can click to enter it manually. You can also hold Shift and drag the grid lines near the end of the loop to fine-tune the BPM for a perfect match.
4. Sequencing, Edit Groups & Parameter Locks
Create evolving patterns using Edit Groups, P-Locks, and probability.
Basic Sequencing
- Step Buttons: Click to toggle steps. Right-Click a step to set Hit Chance (Probability), Flam/Rolls, or assign an Edit Group.
- Grid Size: Right-click the Track Name to toggle the track between 16 Steps (Standard) and 12 Steps (Triplets/8T).
- Polymeters: Alt + Click a step to set it as the "Bar Endpoint." That track will loop independently at that step count.
- Track Speed: Set any track to run from 1/4× to 4× the pattern speed, including triplet ratios — half-time and double-time feels inside one pattern.
- Accents: Toggle the accent row to push individual steps harder, 808-style. The global Accent slider sets how much louder accented steps hit, and accents are preserved in MIDI export.
Edit Groups (32 per track)
Each track has 32 Edit Groups — 32 fully independent sound configurations that can be assigned per step. Every knob position, synth type, distortion mode, EQ setting, and macro is stored separately per group. Use them for true per-step sound design within a single track:
- Switch Active Group: Use the Group selector at the top of the Sequencer to choose which group your knob edits affect. The synth tab, FX, EQ — everything reflects the currently selected group.
- Assign Steps to Groups: Scroll on a step button to assign it to a different group. The step shows a small group number when it's not Group 1.
- Use Cases:
- Tight short kick on the downbeats, longer distorted kick on the off-beats — all on one track.
- Build a whole drum fill on one track by varying the synth type per group.
- Create ghost notes with different velocity, decay, and filter — without touching another track.
- Layer accent variations: open hat on beat 2 and 4, closed hat everywhere else, same track.
Parameter Locks (P-Locks)
Automate any knob per-step without complex menus:
- Select Step(s): Hold Shift and click a step button (or multiple) to select them. They will remain highlighted.
- Lock Parameter: With the step(s) selected, move any slider (Pitch, Filter, Decay, etc.). The slider will indicate a lock is set for those steps.
- Clear Lock: Right-Click any step to turn off its locks. To clear multiple steps at once, Shift-Select them first, then Right-Click.
5. Generative Patterns (GEN)
The GEN tab writes patterns for you — as a starting point or a finished groove.
- Euclidean Fill: Turn the HITS knob to spread that many hits as evenly as possible across the track. You hear the pattern update live while turning; release to commit, or leave the knob where it started to keep your original pattern.
- Dice & Density: DICE rolls a new random pattern, DENS sets how busy it gets. The same dice value always produces the same pattern at a given density, so you can dial density up and down without losing a roll you like.
- Rotate: The arrow buttons shift the whole pattern left or right by one step. Modifier keys change what gets rotated — try them with Shift and Alt held.
Everything the GEN tab writes is a normal pattern afterwards — edit steps, add parameter locks, assign edit groups as usual. And if you don't like a result: full undo/redo has your back.
6. Drum Synth Engines
BeatForge ships with 30+ circuit-modeled drum synths. Switch any track to "Synth" mode and pick from the dropdown.
808 Kit (Eight-O)
Full 808 model: Kick, Snare, Closed Hat, Open Hat, Cymbal, Cowbell, Clap, Low/Mid/Hi Tom, Low/Mid/Hi Conga, Rimshot, Claves, Maracas.
909 Kit (Nine-O)
Full 909 model: Kick, Snare, Rimshot, Clap, Low/Mid/Hi Tom, Closed Hat, Open Hat, Crash, Ride.
Bass & Lead Synths
- Vintage DCO: Classic analog-style oscillator. Warm, characterful, great for chiptune and 80s tones.
- Hoover: The iconic gabber/hardcore lead. Detuned, raw, ready to mangle.
- Reese Bass: Thick, detuned bass with wobble character. Drum & bass essential.
- Supersaw: Seven detuned saws stacked. Trance/EDM/euphoric leads.
- FM Kick: Frequency modulation kick for punchy, modern electronic kicks beyond what 808/909 can do.
- Karplus Snare: Physical modeling with coupled drum skins (A/B interaction) and snare wires for realistic acoustic response.
Macro Knobs
Every synth has 4 macro controls: Shape, Timbre, Color, Aux. The exact parameters they control vary by synth, but the macros are always musically useful — twist them to discover the engine's range.
7. Slicer & REX Mode
BeatForge features two distinct slicing engines depending on your file type.
1. REX Files (.rx2)
REX files are loaded Read-Only. There is no need to open the Slicer tab for these, as the slice markers are pre-defined (use Reason Studios' ReCycle to edit them). Instead, focus on the Playback Mode (S/L/C) toggle next to the track name:
- Slice (S): Play individual slices using MIDI notes. (Tip: Ensure your track's MIDI Input Channel is set correctly in the Mixer Tab to receive notes from your DAW).
- Loop (L): The loop plays continuously, locked to the host tempo.
- Sequence (C): "Creative" mode. Allows you to select a specific start slice/sequence and trigger it using BeatForge's internal step buttons.
MIDI Export: You can drag the REX MIDI pattern directly from the track to your DAW timeline.
Working With Slices
- Mute a Slice: Option/Alt + Click a slice to mute it in place — it stays muted until you unmute it or load a new file. Great for thinning out busy loops.
- Slice Parameter Locks: Select a slice and move any knob to lock that setting to the slice. Slice locks apply both in the internal sequencer and when triggering via MIDI from your DAW.
- Link Groups: Right-click a slice to tag it into a colored group. Shift + Click a group chip to recall its settings on every slice in the group.
- Per-Slice Outputs: Right-click a slice (or a link group) to override its audio output. Anything without an override falls back to the track's Main output.
- Random Slice Mode: Enable Random on the track and every trigger picks a fresh slice — muted and empty slices are skipped automatically.
2. Audio Slicer (WAV/AIFF/FLAC)
For standard audio, open the Slicer Tab to access the full editor.
- Editing: Use the Sensitivity slider to auto-detect transients, or manually Move, Delete, and Lock slice markers directly on the waveform.
- MIDI Export: Once you've sliced the loop, drag the MIDI pattern directly from the track to your DAW timeline to generate a matching MIDI clip — one note per slice.
High-quality time-stretching and pitch-shifting are powered by Signalsmith Stretch by Geraint Luff / Signalsmith Audio, used under the MIT License.
8. Distortion, Lo-Fi & EQ
Distortion (5 modes)
Right-click the Distortion knob to select one of 5 algorithms:
- Soft: Warm saturation with rounded peaks. Default character.
- Hard: Aggressive digital clipping.
- Foldback: Wave-folding distortion that adds metallic, resonant harmonics.
- Hardcore: Extreme high-gain drive (10x boost) with a soft-knee limiter.
- Tube: Authentic Koren 12AX7 valve modeling. Asymmetric saturation with real second-harmonic content. The most musical of the five — use for analog warmth and natural character.
Vintage Lo-Fi (Bitcrusher + Decimator)
Two sliders give you authentic hardware-sampler character:
- Bit Depth: Reduce from 16-bit down to 2-bit. Right-click to select shape:
- Arcade: Clean digital quantization.
- Vintage Sampler: Aggressive noise-shaped quantization with vintage character.
- Crunch: Hybrid — between clean and vintage.
- Sample Rate: Hardware-accurate downsampling with proper anti-aliasing, zero-order hold, and DAC-style reconstruction filtering. Get authentic SP-1200 or MPC60 character without digital nastiness.
BeatForge Sculptor EQ
Five drum-tuned bands targeting specific musical frequencies:
- Sub (60Hz boost + 100Hz cut): Classic Pultec sub trick. Adds weight without mud.
- Thump (120Hz): Chest-hitting punch.
- Clean (400Hz): Boxy lower-mid control.
- Crack (3kHz): Aggressive transient snap.
- Air (10kHz): High shelf routed through asymmetric tube exciter for harmonic sizzle.
High Pass / Low Pass: Standalone resonant filters for additional tone shaping. Fully automatable.
Advanced Envelope (AHDSR)
Precision transient shaping with a 5-stage envelope:
- Stages: Attack, Hold, Decay, Sustain, Release. The "Hold" stage keeps the volume at max before decay, essential for punchy body.
- Tension Curves: Adjust the slope of the Attack, Decay, and Release stages independently. Morph from Logarithmic (snappy) to Exponential (lazy).
9. LFOs & Modulation
BeatForge gives you 10 LFOs, each with a fully editable shape and a deep routing system.
LFO Shape Editor
- Draw Your Own: Click to add nodes, drag to position them. Mid-segment handles control curve tension (logarithmic to exponential).
- Presets: Sine, Square, Saw Up, Saw Down — all built from the same node system, so you can modify them after loading.
- Sync Modes: Tempo-synced (1/16th, 1/8, 1/4, etc. with triplet/dotted options) or free-running in Hz.
- Trigger Modes: Global (always running), Trigger (restart on each note), Envelope (one-shot on trigger).
Routing
- Drag & Drop: Drag any LFO onto any knob to assign modulation.
- Bipolar/Unipolar: Right-click to toggle modulation polarity.
- Bypass: Right-click "Bypass LFO" to temporarily disable without losing your depth setting. Perfect for live A/B comparison.
- Live Visualization: The modulated knob shows the LFO's current value as a moving dot on the ring.
10. MIDI Learn & Hardware Control
BeatForge has deep MIDI integration designed for hardware-first workflows.
MIDI Learn
- Universal Assignment: Right-click any knob, button, or step to assign a MIDI CC or Note.
- Mute/Solo Buttons: Assign to hardware buttons for tactile mixing.
- Step Buttons: Assign to pads or step sequencer hardware for direct programming.
Launch Control XL Integration
Native support for Novation Launch Control XL with bidirectional LED feedback:
- Sequencer Flash: Hardware buttons light up in sync with the playing step on the selected track.
- Mute/Solo Sync: Hardware LEDs reflect current mute/solo state.
- Track Selection: Switch tracks via MIDI and the hardware automatically follows.
MIDI I/O
- Per-Track Input: Each track listens on its own MIDI channel for triggering.
- MIDI Export: Drag any pattern or REX slice arrangement directly from BeatForge to your DAW.
Download & Purchase
Start with the free trial. Buy when you're ready — your license is perpetual.
System requirements: macOS 11 (Big Sur) or later (Apple Silicon & Intel, universal binary) · Windows 10 or later, 64-bit · Runs in any 64-bit VST3/AU host or standalone.
REX Files — Frequently Asked Questions
How do I play REX files in Ableton Live?
Ableton Live dropped native REX support in Live 11. Load BeatForge as a VST3 instrument, drag your .rx2 file in, and the slices map to the step sequencer with tempo-locked playback — no conversion, no time-stretching.
Can Logic Pro, Cubase or FL Studio open .rx2 files?
Not natively in current versions. BeatForge runs as a VST3/AU plugin in all of them and reads .rx2 files directly through the official Reason Studios REX SDK.
Is BeatForge like Dr. Octo Rex outside Reason?
Same idea, different host: BeatForge brings Octo Rex-style REX loop playback — slice triggering, sequenced slices, tempo sync — to any VST3/AU DAW, and adds a full drum machine, per-step parameter locks and multi-output slice routing around it.
How do I create new REX files in 2026?
With ReCycle itself — Reason Studios re-released it in 2025 as a free download, with Apple Silicon and Windows ARM support. Slice your loops in ReCycle, then play them in any DAW with BeatForge: a complete REX workflow where the creation tool costs nothing. BeatForge's own slicer also chops WAV, AIFF, FLAC, MP3 and OGG directly.
More questions? Email beatforgehelp@gmail.com — you'll get the developer, not a ticket queue.